
Version Control for Arduino
Knowing Git and Github is an essential skill for any kind of programming these days. Most libraries are being developed on Github, so you will need to use this site very often.
The main purpose of version control is to make your life easier. Version control systems provide a combination of the benefits listed below, but you can chose to use only those that work for you. It’s easy, pick what you need now, and you will be able to change your mind later if you want.
Some benefits of using version control are
- backup
- experiment
- collaboration
- history and tracking changes
- version control
- CI/CD
Github Desktop application makes first steps with Git and Github easier. We will start here because most people are familiar with graphical user interfaces. But remember that Github Desktop is only a pretty window on top of awesome power that is Git.
Download Github Desktop from desktop.gihub.com. After installation, you should see a screen like this. Create new account or login if you already have one.

You will be asked some initial configuration questions. Fill them, but defaults are usually good.

To setup our project, we need to both create new Git repository and then add our sketch.
In the Github Desktop, click “Create New Repository on your Local Disk”.
In the dialog, fill the fields:
- Name: Blink
- Description: My first repository.
- Local Path: [whereever your Arduino projects are]
- Check “Initialize this repository with a README”.
- Git ignore: None
- License: None or MIT License

When you are satisfied, click “Create repository” and you will be presented with a window like this.

Now open Arduino IDE and then open new Blink sketch.

Save the sketch the same directory where you created your repository in the previous step.
NOTE: The directory should be called Blink as this is what we named our
repository. Make sure you enter this directory and then save the sketch. This
should create another directory called Blink inside it. This is as intended.
So you should have Blink inside Blink directory. I will explain this later.

Finally go back to the Github Desktop. Github has detected that you added new file. This file is only staged. Github Desktop requires your confirmation and some comments to actually add it to the repository.
Fill in the commit title and description. Title should, in a single sentence,
summarize your changes. The description should explain the change further. Your
future self will thank you if you provide helpful information in the
description. Click Commit to main when ready.

After you commit, Github Desktop will go back to the Summary page. It might even seem empty. It is not empty. This summary page simply shows any new changes that were done after the last commit.

To see your commit, click on History in the top left part of the window. This will show you the history or the Log of your repository. All commits since the inception of the project will be listed here.
Currently you see only two. The “Initial commit” which was created when you created your repository. And “My initial commit.” with your first version of your sketch.

So far, your repository exists on your local disk only. While you can work with it on your local machine only, if you need backup, to share your project with others and to collaborate, you will need to publish it to Github.
In Github Desktop, switch back to Changes tab. Here, you will see the
application prominently suggesting that you push changes to Github. Do that by
clicking Publish repository.
In the dialog, update the repository name and description if you want. When
ready click Publish repository.
NOTE: In general, you will want to keep your repositories public. If you do not, you will manually have to invite and give access to anyone you wish to share it with. All open source projects keep this public. It is good to share.

NOTE: If you remember, when creating repository and sketch, we had to create
Blink inside Blink, or Blink/Blink directory. The first Blink is the
repository name. Since the repository name can be anything, there is no
guarantee that it will be called the same as your sketch. But, since Arduino IDE
requires the directory to have the same name as the sketch, this is why we
created the second Blink directory. This way we guarantee that even if we
rename the repository, the sketch directory will always be correct.
Once the repository is published, Github Desktop will bring you back to the
Changes page. Now, lets see our project on the web. Click on the View on Github. This will open a web browser.

Congratulations, your Arduino career is ready to take off.
Keep in mind that now you have two copies of the repositories. First is on your local disk. The second is on Github.
Local repository is used to do all your work. Here, you will change files. Add them to the repository and commit your changes. Often however, these changes will be “for your eyes only”. You will experiment. Commit unfinished code. Whatever. But once you think your code is ready to be shared, you need to copy your changes to the Github repository.
This github repository we often call “remote” or “origin” repository. Its primary function is sharing and collaboration. The process of sending your changes to the remote repository is called “push”. The process of getting changes that others have made in the remote repository is called “pull” or “fetch”.
You need to remember to “push” and “pull” these changes periodically. I use Github as a backup of my work, so I push my changes constantly.
For the purpose of the following demonstration we will use hx710B_pressure_sensor library. This is a random library chosen only because it is not listed in Arduino Library Manager. Therefore it serves as an example how to use such libraries.
Follow the link above or open browser and search for hx710b_pressure_sensor.
You should land on Github page.

Click on the Code button to open a menu, and there click on Download ZIP.
The next step is to unzip this archive into your Arduino libraries directory.
Arduino directory is usually in your home directory or in the Documents
folder. You can always check Arduino IDE preferences for its location.
When done, you should see something like this.

Now you can go back into Arduino IDE. In the Sketch menu, select Include Library. In the sub-menu, you should now see the new library we have added.
NOTE: You might need to open and close Library Manager in Arduino IDE to force
it to rescan for new libraries.

You are done and ready to use the new library, as if it was chosen from the Arduino Library Manager.
If you wish to update the library to the latest version, you should follow the same steps, but first delete the old library directory and unpack the new zip in its place.
With the power of Git, getting, using and updating libraries is even easier.
To demonstrate this, if you followed the previous example, we should first
delete the hx710b_pressure_sensor-main directory we created. Just go to
Arduino/libraries directory and delete it there.
Go back to the HX710B_pressure_sensor library on Github. This time, instead of
downloading a ZIP, click on Clone, select HTTPS tab and copy the URL shown.

Switch back to Github Desktop, and in the File menu, select Clone repository.... In the dialog, select the URL tab and paste the URL into the
appropriate field.
IMPORTANT: When cloning libraries, we have to place them in the appropriate
place. Our sketches go directly into the Arduino directory. However, the
libraries have to be placed into the Arduino/libraries directory. This way
Arduino will recognize the new code properly. Keep in mind that you have to
change destination location when you switch between sketches and libraries.
When ready, click Clone.

After short time, cloning will be done. Github Desktop will now show
hx710B_pressure_sensor as your current repository.

If you check the library folder, you will see the new files there.

To update the library to the latest version, just click Fetch origin in the
top right of the Github Desktop window.
To switch your current repository in Github Desktop, click on the Current repository in the top left of the Github Desktop window.

Branching is where the true power of Git comes to shine.
All your previous commits are safe forever. They cannot be changed any more. You can create new commits with new changes. But if you ever need to go back to the old version, you can.
In the simplest terms, branch is a named commit, that can be independently changed and will build its own history. It shares the common starting point with the main branch, but they are independent until merged. The intention of most branches is to be used for developing features that will take long time. Once the development of these features is complete, the branch is merged or discarded.
Most commonly branches are used when collaborating. Each person works on a separate branch, and only when their feature is fully working and ready to be shared, that branch is merged to the common, or the main branch.
Since a new branch is independent from the parent branch, you can also use it to experiment, try risky changes to your code that can ruin your hard work. So, you make all these changes in a branch, and only if you are happy with the new code, merge it to the main branch.
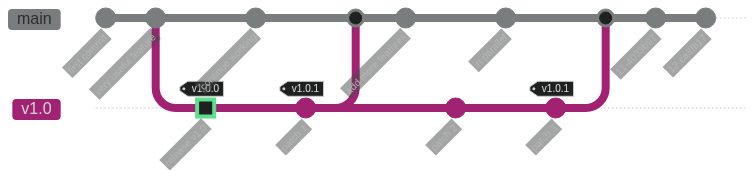
Another common use of branches is for tracking and patching old versions of your
code. You can create a branch for each version of your code. If you ever need to
get a specific version, you can simply get a named branch, rather than default
main branch.
In Github Desktop, make sure the correct repository is select at the Current repository.
Now click on the Current branch in the centre of the window, and again click
on the New branch button. You will get a dialog like below.
Name the new branch descriptively, suggesting why you are creating it. For this
example, I intend to change the timing of our Blink sketch. Therefore, I will
name the branch change-timing.
Click Create branch when ready.

Now, in Arduino IDE, make your changes. I have changed timing of the blinking to be more rapid.

Now save your changes and switch back to Github Desktop. As you can see Github
Desktop has detected your changes. Add your commit subject and description, and
commit the change to change-timing branch.

As an exercise, take a look at the history of your project. Switch between
main and change-timing branches to see the different histories.
NOTE: Each branch has its own life, and likewise, you can chose whether or not to publish each branch to Github. Most branches should be pushed. This will keep your code safe and will allow you to continue working on another machine. But, you do have an option not to push your branch if it is inappropriate for any reason.
Git makes merging very easy. You have no idea how painful it was to merge before Git.
To begin, we need to make main our current branch. This is in line with Git
way of thinking. You are always in the branch that you intend to change. Since
we will be changing main by merging the changes from change-timing branch,
this means that main should be our current branch.

Now, in the Branch menu, select Merge into current branch...

And select change-timing branch as the source of the changes.
In the bottom of the window, you will see summary, that the branch has only one commit that will be merged. This is a good sanity check. If you see a summary with information that does not seem right, you should check if someone else made changes that conflict with yours, or if something else went wrong.
When ready click Create a merge commit.

You are done. The changes from your working branch are now in the main branch.

This is a good time to publish or push your changes to Github.
You can also delete your working branch if you have finished work in it. Remember, all your work is merged into the main branch.
This same mechanism is used when collaborating. Project owner or maintainer will
often receive Pull requests, which are basically branches created by other
developers. Pull request indicates that the author of the change is asking the
maintainer to merge the changes into the main branch of the project. This is out
of the scope of this presentation, and we will cover this when we talk about Git
in depth.
This was an overview of the version control and how to use it for your Arduino projects. There are many other topics we can cover in the future.
- .gitignore
- Git on the command line.
- Git workflows and branching strategies.
- Collaborating on open source projects.
- Continuous integration.